In this tutorial, we will learn how to add or remove Natural Voices in Narrator on Windows 11. Windows 11 offers a built-in Narrator in the Accessibility Settings, that helps its users to access their Windows PC with ease. This experience makes Windows 11 more accessible.
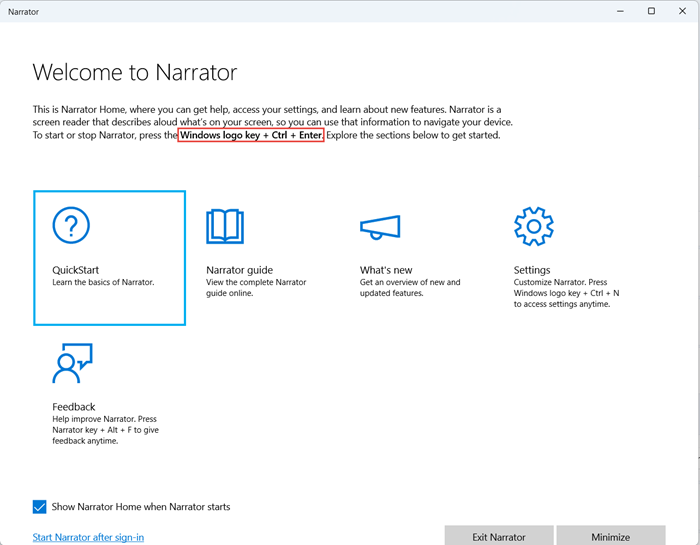
Windows Narrator is a screen reader that reads what is there on your Windows 11 screen. There are natural voices that have been introduced in Windows 11. It enables Windows 11 Narrator users to enjoy scenarios like browsing the web, reading, authoring mail, and more. With the introduction of new natural voices in Windows 11, the overall experience for all Windows users has definitely improved.
How to Add Natural Voices in Narrator on Windows 11
Natural Narrator voices use on-device text to speech in a much relatable human-like voice. Once you download the natural voice, you can conveniently use it even without an internet connection. You can choose to start Narrator before sign-in or after sign-in
Following are the steps involved in adding the new Narrator voices in Windows 11:
- Open Narrator in the Windows 11 Accessibility Settings.
- Select ‘Install now’ on the announcement window in Narrator Settings.
- Select the ‘Add’ button under the Add natural voices section.
- To hear a preview of the voice, click ‘Preview’.
- Select the voice you want to install and click ‘Install’ to start the download of the selected voice.
To open Narrator on your Windows 11 PC, go to Settings > Accessibility > Narrator.
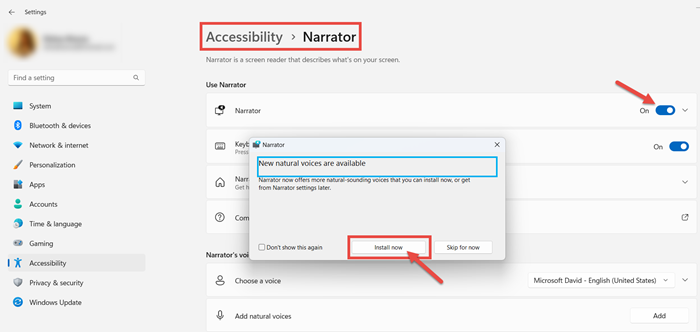
Turn On the toggle button for Narrator. A pop-up dialogue box will appear mentioning that New natural voices are available. Click on ‘Install now’.
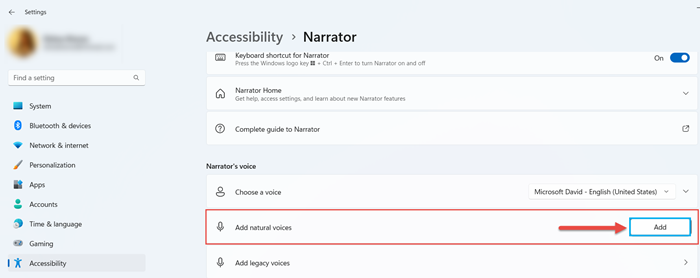
Another way to install the new natural voices in Windows 11 is to click on ‘Add’ on the Add natural voices.
You will see that Narrator provides three U.S. English natural voices. These include two female voices, Jenny and Aria, and one male voice, Guy.
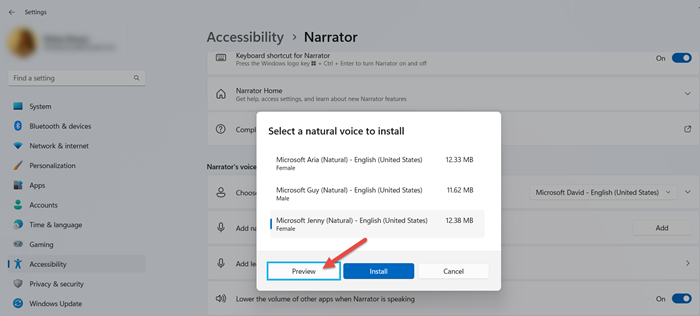
Click on ‘Preview’ to listen to these natural voices, and once you have selected the voice you would like to install, click on ‘Install’. You can install all the available voices, but you must install them separately.
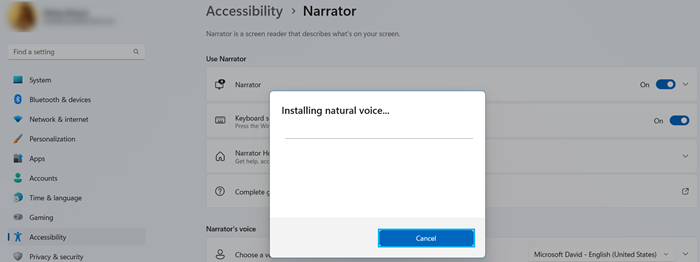
The selected natural voice will now be installed in your Narrator voices.

Furthermore, under the Narrator’s voice settings, you can adjust the speed, pitch, and volume according to your preferences.
This is how you can add Natural Voices in Narrator on Windows 11.
How to Remove Natural Voices in Narrator on Windows 11
To remove a Natural Voice in Narrator on Windows 11, you will have to make use of the command line. So launch Terminal or PowerShell as administrator and run this command first:
Get-AppxPackage -Name "*Voice*"
This will give you the details of the Voice packages installed on your computer.
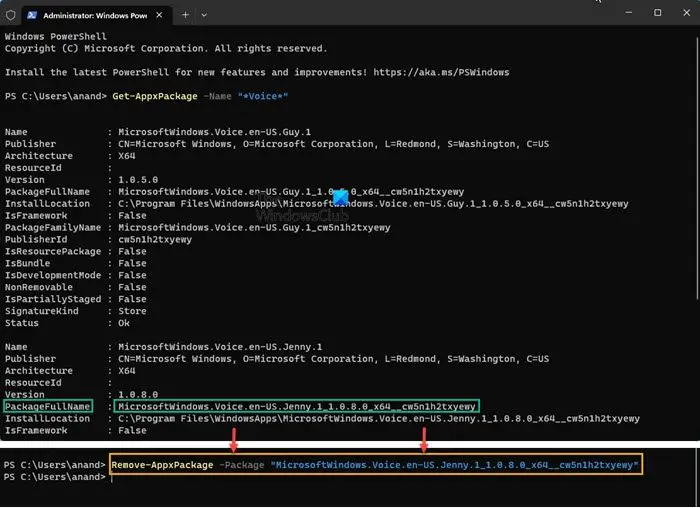
Locate the one you want to remove. Let us say it is Jenny. Note down the PackageFullName for it. It is:
MicrosoftWindows.Voice.en-US.Jenny.1_1.0.8.0_x64__cw5n1h2txyewy
Then you have to run this command:
Remove-AppxPackage -Package "MicrosoftWindows.Voice.en-US.Jenny.1_1.0.8.0_x64__cw5n1h2txyewy"
You will see a message flash, and then the Voice package will be removed.
TIP: You can also disable Narrator on your Windows PC whenever you want.
I hope this tutorial was simple and easy to understand.
How do I add a natural voice to Windows 11?
To add a natural voice to Windows 11, open Narrator in Accessibility Settings. Under Narrator’s voice, click the Add button next to Add natural voices. Choose the natural voice you prefer and install it. You can install each voice separately if you wish to download all the natural voices.
How do you change the Narrator voice on Windows 11?
To change the Narrator voice on Windows 11, go to the Narrator settings. Under narrator voice settings, click the drop-down button for the option Choose the voice, and select the voice of your preference. Additionally, you can also make changes to the speed, pitch, and volume of the selected voice.