In Windows computers, you can print a file or document using the right-click context menu. If you have noticed, Windows shows the Print option in the right-click menu on clicking a file or a document. In Windows 11, you have to click Show more options to view the Print option in the right-click menu. However, some users found the Print option missing from the Windows 11 context menu. In this article, we will show you some solutions to fix this problem.
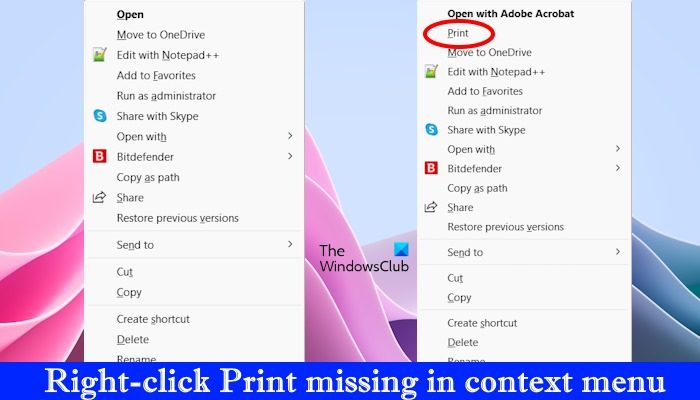
Right-click Print missing from Windows 11 context menu
If right-click Print missing from your Windows 11 context menu, use these fixes to resolve this issue.
- Select Show more options
- Check if the issue is occurring with all or a specific file
- Repair your system image files
- Does your app support this feature?
- Restore your system
Let’s start.
1] Select Show more options
The Print option in Windows 11 does not appear the first time you right-click on a file. You have to select the Show more options in the context menu to view the Print option. The following steps will help you understand it more clearly.
- Right-click on the targeted file, like a document, an image file, or a PDF file.
- Click on Show more options.
- Now, check if the print option is available or not.
If the Print option is not available there, your system image files might have been corrupted or the issue might have been associated with the particular app or software.
2] Check if the issue is occurring with all or a specific file
The first thing you should check is whether the issue occurs with all or only some files. If the issue is associated with only one or some specific file(s), it is possible that the software set as the default for that specific file(s) does not support this functionality.
If the Print option is missing for all the files, your system image files might have been corrupted. However, if the problem occurs on a specific file type, the default app set for that particular file might not support this functionality.
3] Repair your system image files
It might also happen due to corrupted system image files. The Windows operating system has built-in tools to repair the corrupted system image files.
System File Checker is one of these tools that scans the entire system of a user for corrupted system image files and repairs them (if possible). Hence, running an SFC scan may be beneficial for you.
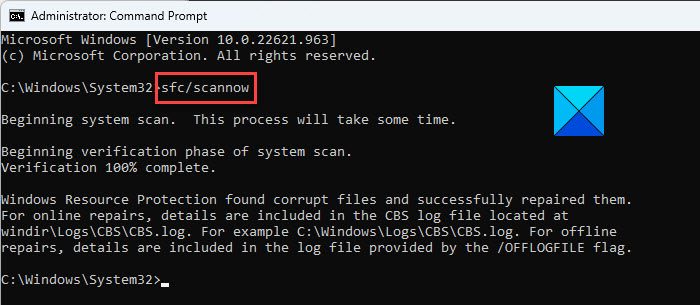
DISM (Deployment Image Servicing and Management) is another system image file repairing tool. In addition to the SFC scan, you can also run a DISM scan to repair the corrupted system image files.
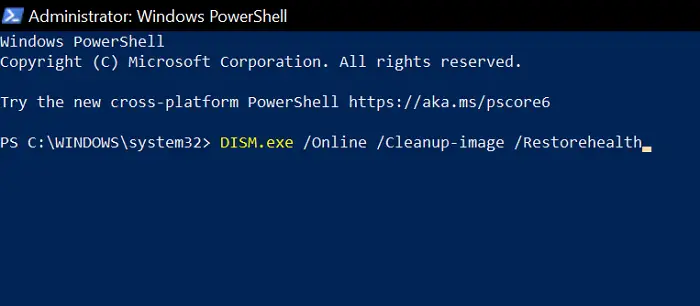
To run a DISM scan, you need to open Command Prompt as an administrator and use the following commands. Press Enter after typing each command.
Dism /Online /Cleanup-Image /ScanHealth
Dism /Online /Cleanup-Image /CheckHealth
Dism /Online /Cleanup-Image /RestoreHealth
4] Does your app support this feature?
It’s also possible that the app you have set as the default for a file doesn’t support this feature. To check this, I reproduced this problem for PDF files by setting Microsoft Edge as the default PDF software.
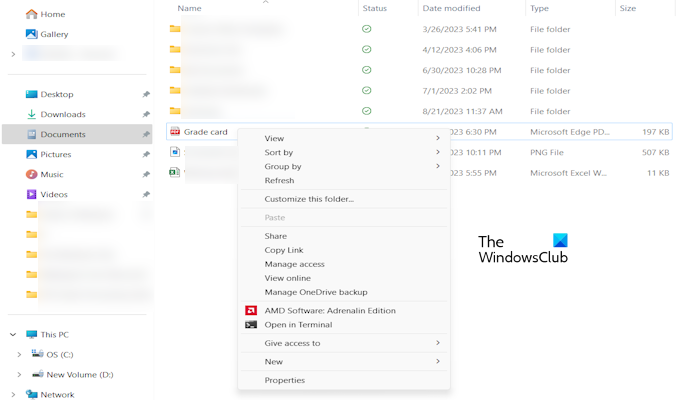
After making Microsoft Edge the default app for opening PDF files, when I right-clicked on the PDF files and selected the Show more options, I found that the Print option was missing in the context menu. In the above image, you can see that there is no Print option for the PDF file in the right-click context menu.
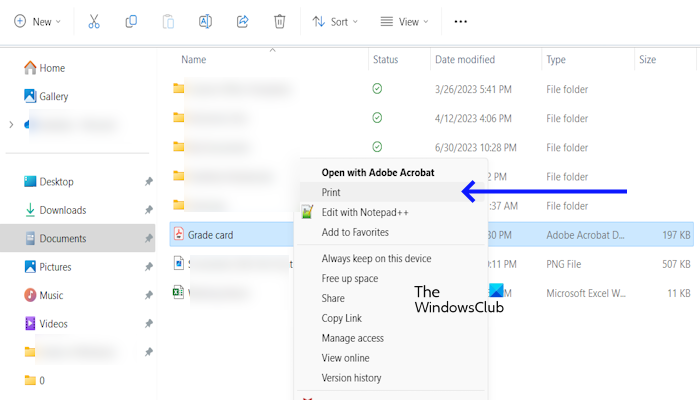
Now, I have changed the default PDF app to Adobe Acrobat Reader. After that, the Print option appeared in the context menu for PDF files (refer to the above screenshot). If you are experiencing this issue with the PDF files and you have set another PDF software as the default app for your PDF files, download and install Adobe Acrobat Reader and set it as your default PDF software. The following steps will help you with that.
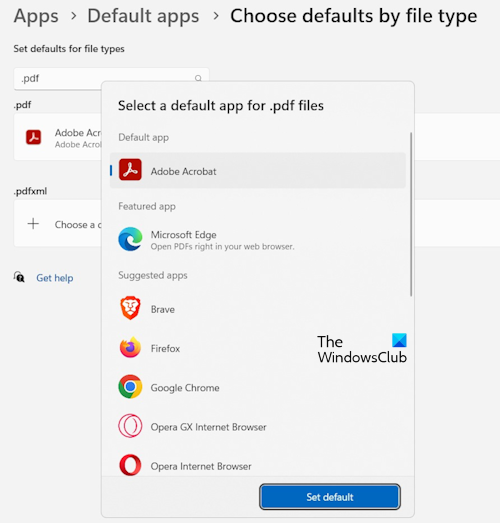
- Go to the Windows Settings.
- Click on Apps from the Settings menu.
- Click on Default apps.
- Scroll down in Related settings. Click on Choose defaults by file type.
- Search for the .pdf file extension.
- Now, select Adobe Acrobat and click on Set default.
5] Restore your system
System Restore is a tool designed by Microsoft to protect and repair computer software. It is recommended to turn on System Restore on a Windows computer. System Restore allows you to roll back your system to a previous point in time by using the restore points. System Restore points are automatically created when you install a new app or driver or make changes to Windows Registry. In addition to this, you can also create a restore point manually. You can use restore points to restore your system if a problem occurs.
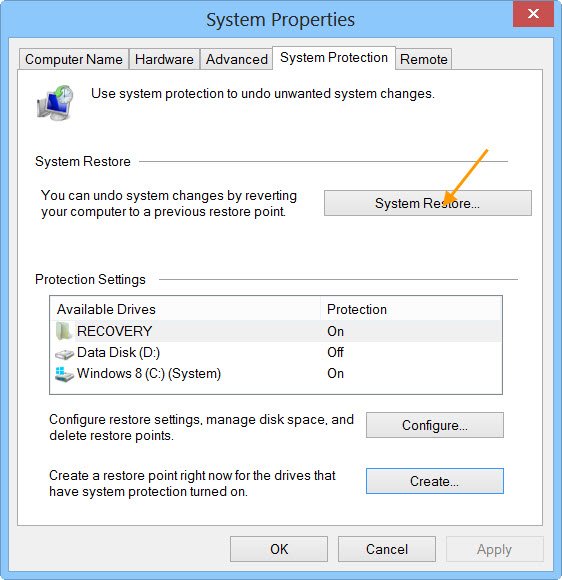
Perform a system restore by selecting a restore point before which the problem did not exist. This will fix the problem but keep in mind that it will also remove or uninstall programs you installed after the date the restore point was created.
I hope the above solutions help you to fix the issue.
How to restore full right-click context menu in Windows 11?
You can restore the old right-click context menu in Windows 11 by modifying Registry. Be careful while making changes to the Registry as any mistake can make your system unstable. If you do not want to make changes to your Registry, you can also use our Ultimate Windows Tweaker.
How do I add a program to the right-click menu in Windows 11?
Windows 11 allows you to add programs to the right-click context menu. But for this, you have to modify the Windows Registry. Hence, be careful when making changes to the Registry.
Read next: Right-click Restart Explorer adds the Restart Explorer option to the Context Menu.