PictBear is an excellent free image editing tool for Windows, that helps users to edit their photos any which way they want and can be considered as a free alternative to Photoshop. What follows in this post is a detailed manual on how to use PictBear to edit your images.
PictBear review & tutorial
Whether you need to give your images a professional touch or add a simple text, PictBear can do it all. From creating an image entirely from scratch to enhancing an existing image – everything can be done with this free image editing tool for Windows.

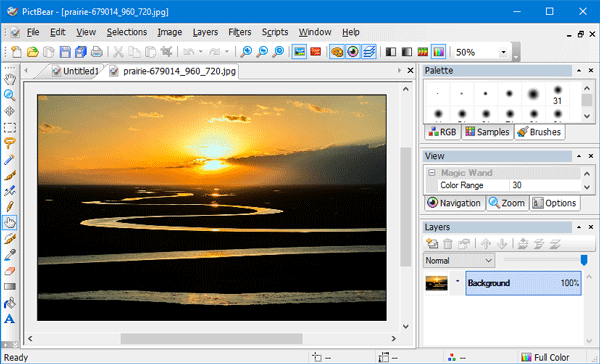
The UI of PictBear is up to the mark. Despite the fact that it comes with many features, you get to see a clean interface since all the options are well categorized. In case you have used Photoshop, you will probably find a similarity with regards to the look and feel of this tool. There is a top menu bar, and bars on both sides, which stuffed with options.
On the left side, you can find some tools like Zoom, Magic Wand, Paint brush, Air brush, Text, Color picker, Eraser, and many others. On the right side of PictBear, you see Layers, Palette, and options to manage effects like blur, color range, brush, etc. The special feature of PictBear is “Layers.” The vast majority of image editors do not have “layer” support but PictBear has. This feature allows you to edit pictures in a better way.
Edit images with PictBear
It is very easy to understand the features of PictBear and get started with this tool. Before editing an image, be sure about the changes you want to make. Then, open the image by pressing Ctrl + O and start editing it according to your requirements.
If you need to change image type, go to Image > Image Type > select one (Mono, Grey style, Index Color, etc.).
If you want to add blur, go to Filters > Blur > select either Soft Blur or Hard Blur. However, the drawback is you cannot change the depth pf the blur.
The Layer feature is a very useful function of this image editor because you do not have to press Ctrl + Z to undo a particular effect. You can delete the layer. To do so, right-click on the layer that you want to remove and select “Delete Layer.” The “Layer Properties” will aid you to choose the layer mode, opacity as well as visibility. This last option can help you to remove an effect without erasing the layer.
Sometimes we want to erase the background of an image. PictBear can do that job using “Magic Wand.” You have to select Magic Wand from the left-hand side.
The tool also lets you edit multiple images in different tabs at the same time. There are more other features included in PictBear. Just start using this tool to get them all.
What can I use instead of Photoshop for free?
There are multiple tools you can use instead of Photoshop for free. For example, PictBear is one of the best image editing tools, which has a lot of similarities to Photoshop. For example, the user interface, layer management, menu bar, etc. The best thing is that PictBear is available for free for Windows 11/10.
What is the best alternative for Photoshop?
There is no one-stop solution when it comes to Photoshop alternative since Photoshop is a one-of-a-kind tool for professional image editors. However, if you want to get a tool that resembles many features to Photoshop, you can certainly try GIMP, Photopea, Polarr, etc. However, you can also check out the PictBear, which is a simple yet handy tool.
If you like this freeware, you can download PictBear from Softpedia. During installation, you will be offered a checked box in front of – Use simple and gracile web search with search bar in IE. You don’t need it, so uncheck this box and proceed to click on Next.
UPDATE: The download from its homepage offers to install Avast, Secure PC Cleaner, ByteFence, etc, which are tricky to opt out of. Hence I am removing its home page link. You can instead download it from Softpedia and ensure that the pre-checked box to install a search bar during installation is unchecked.