The large-scale deployment of Surface devices for business use can make it vulnerable to data theft. As such proper management of these devices becomes a priority, especially when they are sent to some third parties for repairing purposes or re-purposed for a new employee. Microsoft offers a handy solution for this – Microsoft Surface Data Eraser.
Microsoft Surface Data Eraser
Microsoft Surface Data Eraser is a simple tool that boots from a USB stick and allows a user to perform a secure wipe of all data from a compatible Surface device and makes it ready for a trip to the repair center or a new user. The USB stick is easy to create as the application has a built-in wizard. Moreover, it is easy to use as it has a simple graphic interface with no command line needed.
Some other Scenarios where Microsoft Surface Data Eraser can be helpful include:
- Decommission a Surface device to be removed from corporate or organizational use
- Standard practice when performing re-imaging for devices used with sensitive data
How to create a Microsoft Surface Data Eraser USB stick
To create a Microsoft Surface Data Eraser USB stick, first, download & install the Microsoft Surface Data Eraser. Please note that you do not need a Surface device to create the USB stick. After you have downloaded the installation file to your computer, simply run the DataEraserSetup.msi installation file that you downloaded from the Microsoft Download Center.
Once the tool has been installed on your system, follow these steps to create a Microsoft Surface Data Eraser USB stick (ensure that you have a USB 3.0 stick that is 4 GB or larger in size)
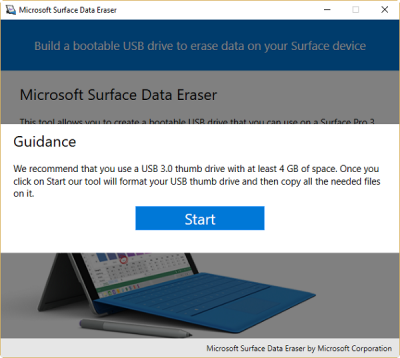
Start Microsoft Surface Data Eraser from the Start menu and click Build to begin the Microsoft Surface Data Eraser USB creation process. After that, hit the Start button to acknowledge that you have a USB stick of at least 4 GB connected.
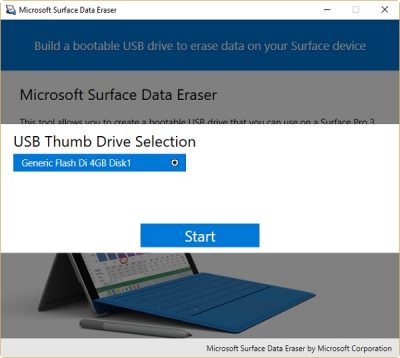
Next, select the USB drive of your choice from the USB Thumb Drive Selection page. When done, click Start to begin the USB creation process. The drive you select will be formatted, and any existing data on it will be erased.
In any case, if you find the Start button is disabled, verify again that your removable drive has a total capacity of at least 4 GB.
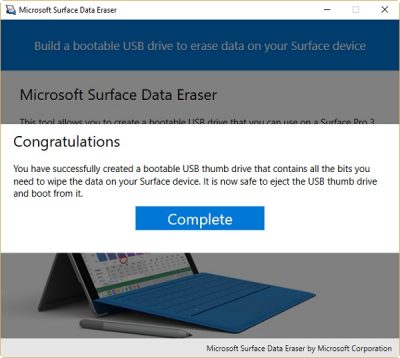
Once the process is complete, the USB drive will be formatted and all binaries will be copied to the USB drive. Click Success!
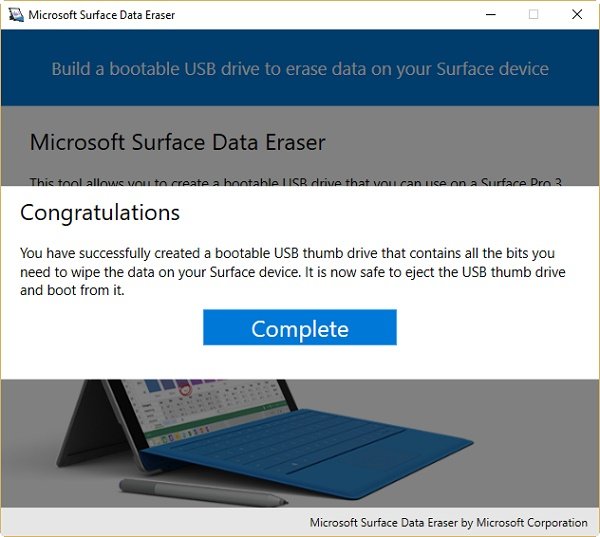
Now, when a congratulatory message is displayed on the screen of your device, you can eject and remove the thumb drive. This thumb drive is now ready to be inserted into a Surface device, booted from, and wipe any data on the device. Click Complete to finish the USB creation process.
When the process is complete, click X to close Microsoft Surface Data Eraser.
How to use a Microsoft Surface Data Eraser USB stick
You can boot a supported Surface device from the USB stick you just created by following this procedure:
- Insert the bootable Microsoft Surface Data Eraser USB stick into the supported Surface device.
- Before this activity, make sure your system firmware is set to boot to USB. To enter the firmware settings:
- Turn off your Surface device.
- Press and hold the Volume Up button.
- Press and release the Power button.
- Release the Volume Up button.
When the Surface device boots, a SoftwareLicenseTerms text file is displayed. If required copy the contents of the text file to a notepad and do the cursory reading.
Select one of the following three options:
- Enter S to start Data Erase – Select this option to begin the data erase process. You will be prompted again to confirm the action. Ignore it and proceed further.
- Enter D to perform Diskpart – Select this option to use diskpart.exe to manage partitions on your disk.
- Now, enter X to shut the device down – Select this option to perform no action and shut down the device.
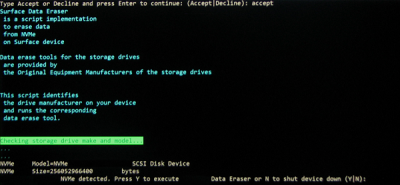
Please note – If you typed S to begin the data erase process, the partition that will be erased is displayed, as shown in the figure below. If this is correct, press Y to continue.
When you do so, an additional dialog box will be displayed to confirm your choice.
Click the Yes button to continue erasing data on the Surface device.The way it works is quite simple. All you have to do is create a bootable USB stick that can then run the secure wipe for you, all automatically. Microsoft says the data can’t be recovered, so you’re all safe.
It is compatible with all Surface devices running Windows 10 and Windows 8.1 includng:
- Surface Book
- Surface Pro
- Surface
- Surface LTE
- Surface Laptop
A word of caution – Since the application removes files beyond repair it is advisable to back up your data before anything worse happens.
Microsoft Surface Data Eraser is available for free at no charge. For more information, visit this page of Microsoft. To download it, visit the Microsoft Download Center. It is a 361 MB download.
