Microsoft has pushed hard for Gaming on Windows 11/10 PCs. Every update has got something for gamers, but it’s not without hiccups and issues around gaming. One of the major problems reported by users is Game Stuttering with FPS drops for games they play. The problem is partly with drivers, partly with updates that roll out to Windows 11/10. In this guide, we are talking about tips to fix Game Stuttering with FPS drops in Windows 11/10.
What is Game Stuttering with FPS Drops
It’s a rendering issue where content on your screen changes all of a sudden. This can happen for many reasons, but, if the GPU takes longer to render a frame than expected, it might even skip the frame or result in lag. This is easily noticeable during multiplayer games. You would see actions happening much later after you did it using a controller or mouse. Many a time, if a driver takes very long to prepare a frame for the GPU, which means you will see everything delayed.
FPS or Frames per Second is a result of stuttering. So for example, 60 FPS means 60 frames per second. It is the frequency (rate) at which consecutive images called frames to appear on a display. If you have a fast-moving figure, which happens in the games, a higher FPS offers a better experience.
Read: Gaming Lag, Low FPS, in video games, and how to fix them.
Fix Game Stuttering with FPS drops
The good thing is that Microsoft, Graphics card OEMs including NVIDIA have officially recognized these issues. There had been major discussion around forums for this. Let’s take a look at the possible solutions.
Fix Low FPS and Game Stuttering on Windows 11
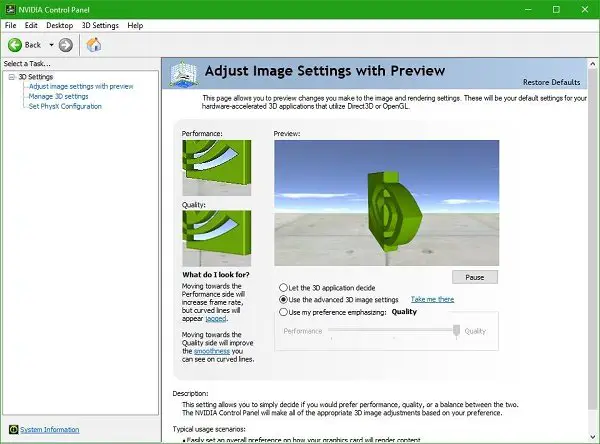
1] Change NVIDIA control panel settings
This applies to any OEM which offers a control panel to improve the gaming experience. NVIDIA had been at the top of the discussions. Some Windows Update reset the settings, and lower the down FPS rates which are set as default. So look at the control panels from your OEMS, and change things accordingly. They probably come with Gaming Settings which you can select, and enjoy better FPS rates.

You can also assign dedicated GPU control to those games for better performance.
2] Update all NVIDIA drivers from NVIDIA official site
This is probably the best shot you have got without doing a lot of troubleshooting. Depending on which graphics card you have, visit the OEMS website, and download the latest driver they have. Install it, and if you are lucky enough it will fix your FPS drops and Stuttering.
Read: Free FPS Counter Software for Windows PC.
3] Enable Vsync in the NVIDIA Control Panel
To make sure your PC changes the frames as the graphics card sends out new output, you need to enable Vsync. It limit’s your GPU to output frames as high as the refresh rate of your monitor. This makes sure that it reduces screen tearing but can introduce input lag.
Launch NVIDIA Control Panel > Manage 3D settings > Global Settings > Vertical sync > On.
Related: How to configure the best FPS settings for gaming on a PC
4] Use Maximum Performance
To make sure Games get maximum GPU cycles, it’s best to change the power management mode to prefer maximum performance. Open Control Panel > Manage 3D settings > Select a program to customize > Power management mode > Prefer maximum performance.
Read: Windows computer stutters every few seconds.
5] Use NVIDIA GPU instead of CPU
If your settings have somehow changed to use NVIDIA CPU instead of NVIDIA GPU, change it. In the control panel, configure surround PhysX.
6] Change Other Windows Settings
- Disable gaming option in Windows 10 which is available in the settings. Go to Settings > Gaming > Gaming mode, Xbox, turn off the options.
- Reinstall the games sometimes solve the problem. While updates do help, but if something is misconfigured, this is your best chance.
- Check your game settings. Most of the games offer the option to raise FPS which works best for that version of PC.
- You can turn off Full Screen Optimization. To do this, find the exe file of the game, and then Properties > Compatibility > Disable Fullscreen optimization.
- Disable Diagtrack service.
- Disable antivirus while gaming.
- Run SFC on your computer. It may fix some corrupted systems files on the PC.
- Reduce the PC resolution by going to Settings > System > Display > Scale and layout > Resolution.
- Disable Intel Turbo Boost by changing Power Plans.
- Control panel -> Hardware and Sound -> Power Options > Change advanced power settings
- Select Processor power management and expand it.
- Expand the Maximum processor state and modify both On battery and Plugged into 99%.
- Then simply click Apply and OK.
Related read: Tips to improve gaming performance.
Keeping in mind the Intel Turbo Boost option, whenever you are gaming, always choose to use the battery plan which offers maximum performance, especially when you have a gaming laptop. Check out our detailed guide on Ultimate Performance Power Plan for Windows 11/10.
Read next: Game Booster Software to boost gaming performance.