If you want to remove pre-installed Windows 11/10 apps from your computer, you can find the Bloatware Removal Utility pretty handy. It is an open-source application that lets you uninstall or remove pre-installed and third-party apps with the help of Windows PowerShell.
Windows 11 and Windows 10 come with a lot of additional apps, such as 3D Viewer, OneNote, Alarms & Clock, Maps, Money, Weather, etc. Although some people use those apps, a huge amount of people haven’t opened them since they installed the OS on their computers. If you are one of them and you are running out of hard disk space, you can delete those unnecessary apps from your PC
Bloatware Removal Utility options and features
Bloatware Removal Utility doesn’t have a lot of options like CCleaner, Revo Uninstaller, etc. However, it does the job pretty well and swiftly. Here are a lot of features, options, and things you must know about Bloatware Removal Utility:
- The first feature of this app is that you can uninstall any installed application from your computer. Whether it is UWP, Modern app, Metro app, Windows Store app, or third-party app, you can remove all of them from your computer.
- It uses Windows PowerShell to uninstall apps.
- It requires administrator rights to open the app.
- Use the Toggle Suggested Bloatware option to find all the unnecessary apps quickly.
- It creates a System Restore point before uninstalling any app so that you can be on the safe side.
- You can export the selected app list. It is handy when you need to send a list of apps you have removed from your computer to someone.
This app comes with some other options here and there. However, you need to use it to find them all.
Bloatware Removal Utility for Windows 11/10
To remove Windows 11/10 pre-installed app using Bloatware Removal Utility, follow these steps:
- Download the app from GitHub.
- Extract the files.
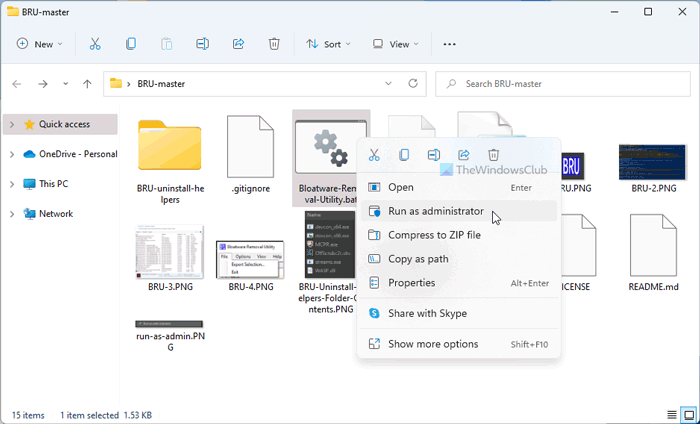
- Right-click on Bloatware-Removal-Utility.bat and select Run as administrator.
- Click on the Yes button.
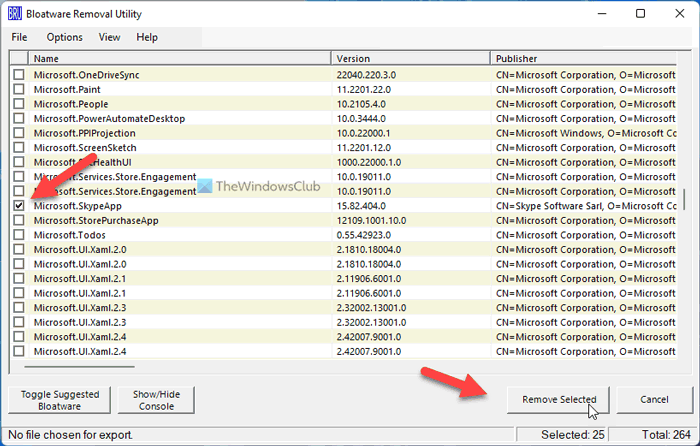
- Tick the app you want to remove.
- Click the Remove Selected button.
- Enter Y in the PowerShell window.
First, you need to download the app from GitHub and extract the files. After opening the BRU-master folder, you can find a file called Bloatware-Removal-Utility.bat.
As mentioned earlier, you need to open the app with administrator privilege. That is why you need to right-click on Bloatware-Removal-Utility.bat and select the Run as administrator option.

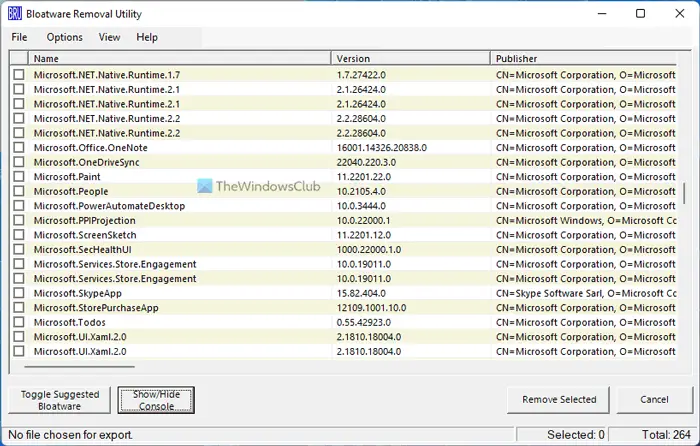
Then, click the Yes button. After that, you can find a window like this:

You need to tick all the apps you want to remove from your computer. However, if you want to do this task automatically, you can click on the Toggle Suggested Bloatware button.
Then, click the Remove Selected button.

It will open the Windows PowerShell on your PC. You may need to enter Y to continue with the process.
That’s all!
If you like, you can download Bloatware Removal Utility from github.com.
How do I uninstall pre-installed apps on Windows 11?
There are multiple methods you can use to uninstall pre-installed apps on Windows 11. For example, you can use Windows PowerShell to get it done. On the other hand, you can use the Bloatware Removal Utility, which is an open-source application. Apart from these, you can use Crapware or Bloatware Removal Tools like 10AppsManager, Windows10Debloater, etc.
How do I permanently remove bloatware from Windows 11?
To permanently remove bloatware from Windows 11, you can use Windows PowerShell. You can use the Get-AppxPackage command to find all the pre-installed apps on your computer. Then, you can use this command to remove them one after one: Get-AppxPackage <AppName> | Remove-AppxPackage.