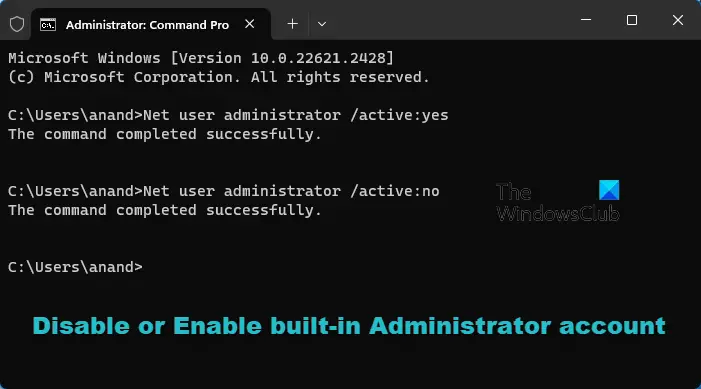
In this post, we will show you how to disable or enable the hidden super built-in Administrator account in Windows 11/10 using the command line. It is similar to the root account in Unix.
In Windows XP and the earlier Windows versions, there was only one Administrator account, and most single users used it as their main account. But Windows Vista and later, i.e., Windows 11/10 and Windows 8/7, have another built-in Administrator account, which may be referred to as a secret hidden super built-in Administrator account. It is hidden & turned off by default, and is similar to the ‘root’ account in Unix.
The use of this Administrator account is being phased out in Windows, and there’s seldom a need to use it instead of another administrator account. On installation of Windows, the Administrator account is disabled.
If you had earlier upgraded from Windows XP and Administrator is the only active local administrator account, then Administrator remains enabled. In this situation, it is placed in Approval Mode, for purposes of UAC. Since it is not subject to UAC prompts and runs with full administrative privileges, it’s rather risky to run it on a regular basis. Any application could then have full control of the computer.
I therefore suggest using this built-in Administrator account sparingly, only when you need to perform several administrative and don’t want to be bothered by UAC prompts. Initially, this ‘super’ Administrator account does not have a password, a serious vulnerability for a full-fledged administrator account. It is best to assign a strong password to this account at the earliest opportunity.
Disable or Enable built-in Administrator account in Windows 11/10

To enable, activate, or turn on this built-in Administrator account, type CMD in the search box. CMD will appear at the top. Right-click on it to ‘Run as administrator’.
To enable this built-in Administrator account, type this command & hit Enter:
Net user administrator /active:yes
To disable this built-in Administrator account, type this command & hit Enter:
Net user administrator /active:no
If you decide that you need a password for the administrator’s account that you are going to activate or if you are unable to activate it with a blank password, run the following commands:
Net user administrator P@$w0rd
Net user administrator activate:yes
You will get a message: The command completed successfully. (Where P@$$w0rd has been taken as an example password).
Enable Built-in Administrator Account using PowerShell
Open an elevated PowerShell window and execute the following command to enable it:
Enable-LocalUser -Name “Administrator”
To disable the administrator account, use the following command:
Disable-LocalUser -Name “Administrator”
TIP: This post will help you if the Administrator Account has been disabled.
Switch the user and log on using this password

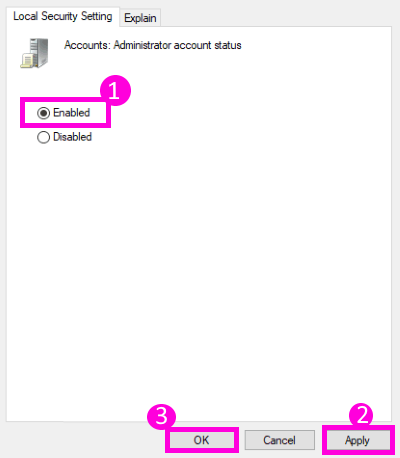
You may also type secpol.msc in the search box and hit Enter. This will bring up the Local Security Policy.
On the left side, click on Local Policies > Security Options. Now on the right side, you will see the first entry as Accounts:Administrator account – Disabled.
Right-click on it > Click Properties > Enable. Close.
Reboot.
TIP: You can also use our Ultimate Windows Tweaker to easily enable or disable this built-in Administrator Account.
Why would you want to operate this built-in Administrator account?
- You don’t want to be ‘annoyed’ by UAC.
- This ‘super’ administrator account has elevated privileges. This means that you can run CMD with unrestricted access to the command line.
- You need to carry out some serious troubleshooting.
- You have locked out your main account by accident, and you want a backdoor entry.
Related reads:
- How to create a new hidden Administrator User Account
- How to delete the inbuilt Administrator Account
- How to rename built-in Administrator Account in Windows.